Operation Guide. The menu on the left is used to conduct a leak test.
Section 9.11 Operating Manual
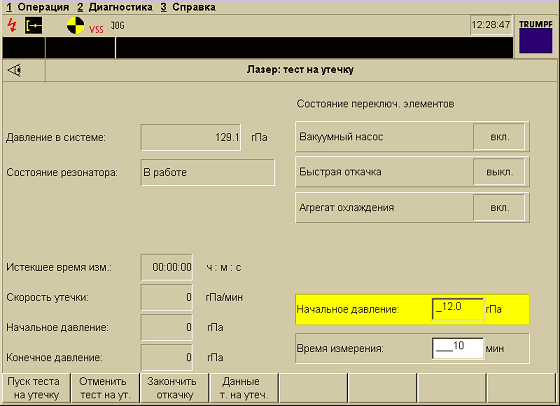
Laser: leak test
Options
Soft keys (physical keys located below the screen, the meaning of which is signed on the LCD monitor at the bottom of the screen):
Starting a leak test. & nbsp; To start a leak test, press the Start Leak Test soft key. The parameters for the leak test are taken from the control system (the “actual value” of the control system corresponds to the entered setpoint). The pressure in the resonator is reduced to the required initial pressure. Upon reaching the initial pressure (message in the remarks line) a leak test begins. After the expiration of the entered time interval, the pressure in the laser is determined (final pressure), on the basis of which the leak rate is calculated. The calculated pressure is shown.
Abort Leak Test To interrupt and terminate a Leak Test, press the Abort Leak Test soft key. Indicates the leak rate determined up to this point.
Finish pumping To interrupt pumping of the resonator until the specified initial pressure is reached, press the softkey Finish pumping.
Data t. for leakage. To display the parameters of the previously conducted leak test, press the softkey Data leak test
Conduct a leak test.
Conditions:

1. Select the scope of operations "DIAGNOSTICS - Laser - Leak test".

2. Use the Focus key to select the "Initial pressure" field.

3. Enter the initial pressure from the keyboard.
4. Use the Focus key to select the "Measurement time" field.
5. Enter from the keyboard the initial time during which the measurement will be held. In the standard version, the specified measurement time is 2 minutes.
6. & nbsp; Press the " Start Leak Test " softkey.
Wait until the message "TruFlow Laser: Leak Test Complete" appears.
")
")
")